Part 1 - The Command Line
This is the beginning of the course material. The primary goal of the first part is to get to know the command line in a Unix-like environment.
The learning goals for this part
The goal is that after this part the student
- Will understand the differences between a graphical and a text-based user interface.
- Can navigate in the file system using the command line.
- ls and the options -a and -l
- cd
- mkdir
- Can create and open, save and close a file with some command line text editor
- nano
- vim
- Can use relative and absolute paths to refer to files and folders
- Understands the difference between the home folder and the root folder.
- Can copy and paste files and folders from the command line
- Can give several files to a program as an argument with the * wild card.
- Can handle text files on the command line.
- cat
- tail and head, and the option
n - grep
- Can handle output on the command line
- The pipe |
- > and >>
- Can create an SSH key pair and establish an SSH connection to another system.
- Can search content from the internet using the command line
- wget
- Can read the output of the command ls -l.
- Can modify the permissions of a file or a folder.
- chmod
- Can write a simple bash script and run it.
- Understands the meaning and the possible dangers of using sudo.
- Can search for information about the command line and its programs from the Internet.
The command Line
Computers are an inseparable part of the modern society. The average citizen is likely to use several different kinds of computers every day. Computers are also arguably the most important tool for computer scientists.
You are probably used to using computers in a certain way. Creating, searching and deleting files is most likely easy for you. You know that double clicking a folder moves you inside it, and you know how to open the window prompt for deleting a file, or how to open an image with a specific program.
The former is an example of a graphical user interface (GUI): The possible actions are presented in some sort of menu and chosen by clicking. Files can also be dragged and dropped to new places. Contrary to the graphical user interface, the command line is a text-based user interface. This means that one does not use the mouse for choosing specific actions. Instead, the computer is given commands by writing them and pressing enter. The options are not presented in the same way as in a graphical environment, and one can get by without using the mouse at all.
There was a time when a text-based user interface was the only possible way to use a computer. Nowadays graphical user interfaces are common and work quite well. However, the command line remains a vital tool for programmers. For lots of tools created for programmers, a GUI doesn’t exist, and using the command line is the only option. In addition, a GUI can be tediously slow for some use cases, when handling large amounts of data for example.
Let’s start by opening the command line. In Ubuntu and several other Linux-systems you can do this by pressing CTRL, ALT and T at the same time. In MacOS write “terminal” to Spotlight (⌘ + Space) and press Enter. YOu can also search the computer’s applications for “terminal”.
In any case, a new window should open in front of you. There should be a blinking cursor and some text which looks something like the following (the example is from a Linux computer):
user@computer:~$
The text in front of @ is your username on the computer, and the following text before : is the computer’s name. The executable command is written to the space pointed by the blinking cursor, and run by pressing Enter.
$-symbol is often included in front of the command. The dollar sign is used to indicate that the command should be run in the command line as a normal user. You should not include it in the command.
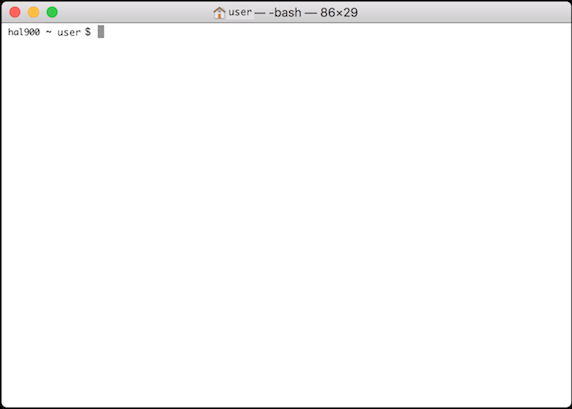
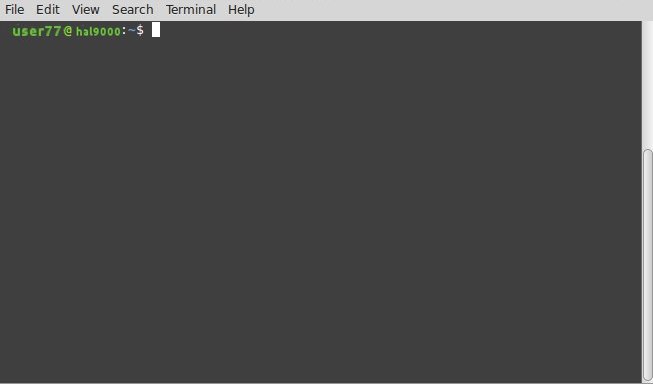
You can see the default terminals for MacOS and Ubuntu above.
Commands
Text-based user interfaces work with commands. A command is a piece of text you write to the command line to make the computer do something. With commands you can run programs, which can for example copy files or establish connections between systems.
An option or a flag is a parameter which allows the user to add features to the command. They are most often binary, behavioral settings, which the user turns on or off. Some options require additional parameters, which are written after the option. The possible options are predefined by the command. They are given to the command with a dash (-).
An argument is an unconstrained value defined by the user. The most common example of an argument is a file name. The argument defines usually the target of the command: where a file should be copied, or what it should be renamed to.
Here are two examples of commands, where you can see how options and parameters can be used:
ls -la Downloads/tiedosto
First, try to run just the command ls in your home folder and observe the output. Then run ls -la and ls -la ~/Downloads. You don’t have to understand what the command does, but you should notice that the outputs look different each time.
ls is a very commonly used command, which you will learn how to use in this part. It displays information about the files in your file system. By default, it prints out the names of the files in the current directory. With the options -a and -l (notice how two options are given to the command in the example above) affect what information is printed out. If you give the command ls a path to a directory as an argument, it will only display information about the contents of that directory. This demonstrates how options are used to change and specify the behaviour of a command.
The callable program defines which commands it offers. Usually you can see the possible commands by adding the option --help (or -h for short) to the end of the command. You can see a more specific user guide with the command man by giving the program name as argument (for example man ls).
If the computer doesn’t recognise the command given, an error message will appear:
user@computer:~$ asdf

Command 'asdf' not found, did you mean:

  command 'asdfg' from deb aoeui
  command 'sadf' from deb sysstat
  command 'sdf' from deb sdf
  command 'adsf' from deb ruby-adsf

Try: sudo apt install <deb name>

user@computer:~$
The computer suggests similar programs, and finally advises to install the program.
Let’s take a look at the man page for the command ls. Running the command man ls on the command line will yield the following:
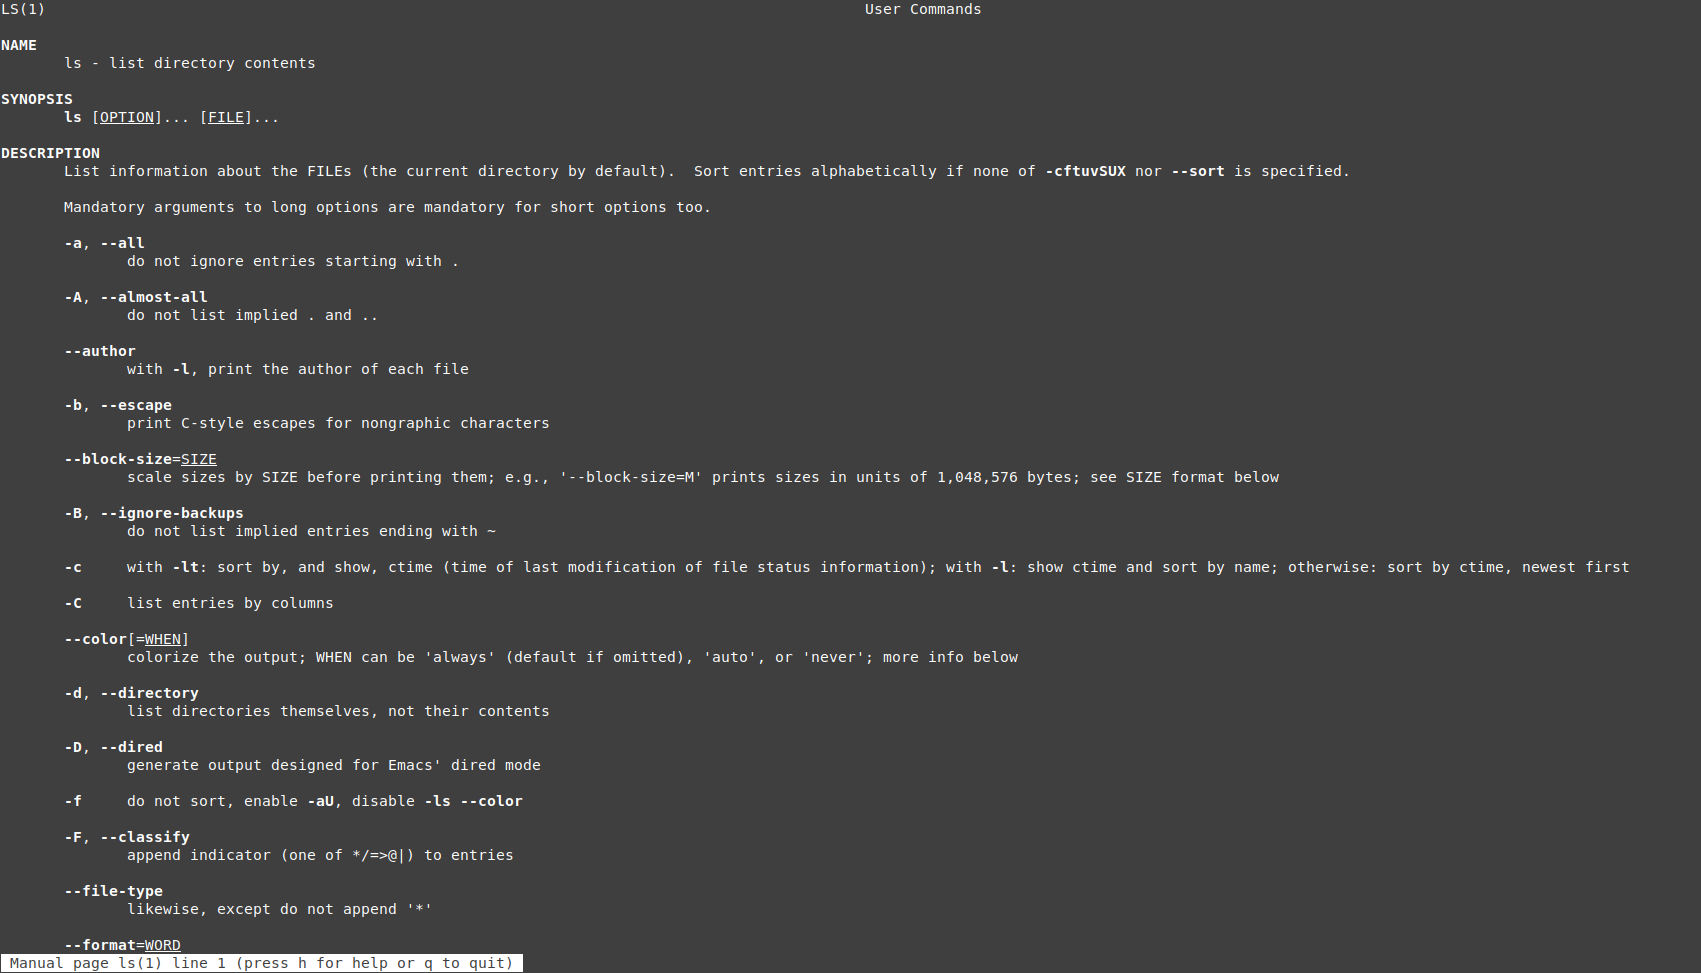
Even though man pages can be hard to read for beginners, they usually offer the most comprehensive documentation available for a specific command.
The “name” section gives you an overall understanding about what the command does. “Synopsis” tells how you can call the program. In the case of the command ls for example, the options should be given to the command before the file path. Both the options and the file name are optional parameters, which is why they’re written inside square brackets.
man page using the arrow keys, and exit by pressing q.
Options are sometimes given two forms: a short form, which is usually just one character, and a long one. The short form is given to the command with just one dash (-), and the long form using two dashes (--). The man page displays both options, as you can see in the image above.
Note that if you want to give a command an argument containing spaces, it has to be given inside quotation marks. Otherwise the command line will interpret it as a separate command or argument.
ls "i am a badly named file"
or
ls 'i am a badly named file'
File management using the command line
You can browse and manage files using the command line just as in the graphical environment. Let’s compare managing files using a graphical and a text user interface.
Open the graphical file browser. In ubuntu, open the application called “Files”, or write the command nautilus and press ENTER. In Windows write explorer.exe instead. In MacOS, open finder and press the keys Shift + Cmd + H.
You should now be in your home folder. The home folder holds all the personal files and folders of a user. If you are using one of the department’s computers, the contents of your home folders are the same regardless of which physical computer you are using. This is because the contents are fetched from elsewhere. If you are using your personal computer, the home folder only includes the files on that physical computer.
Note that if you opened the graphical file browser using the command line, the shell is “locked”, and you can’t run any other commands using that window. You can close the currently running program by pressing CTRL + C. You can press the keys repeatedly if necessary.
Your home folder probably contains a bunch of miscellanous files and folders, like Downloads and Documents. Open the command line in order to see the same folders on the text-based interface. You can do this by writing ls on the command line and pressing ENTER. The output should something like this:
user@lcomputers:~$ ls
Desktop  Documents  Downloads  Music  Pictures  Public  Templates  Videos
When using Windows you might see following instead:
dir: cannot access 'Downloads': No such file or directory
user@computer:~$
If so, try using cd /mnt/c/Users/username first.
You’ll notice how ls lists out all the files and folders in your home folder. You should see the same ones as in the graphical user interface, only in a simpler form.
By default the command line opens up the home folder. In order to visit other folders a command for changing directories is required. This can be done with cd, abbreviated from change directory. The cd command is given the directory where you want to go as an argument. If you don’t give cd any arguments, it will take you to the home folder.
Now, navigate to the Downloads folder by running cd Downloads. Note that the command is case sensitive, so the folder name should be given exactly as it appears in your system. After running the command, your command line prompt should look like this:
user@computer:~/Downloads$
The part after : is the current, active folder. ~ refers to the user’s home folder.
Run the command ls again. You have now changed directories, so the output should be different from last time.
The command ls can also display more specific information. Move back to the home folder (for example by running cd without any extra arguments), and keep the graphical user interface open next to the command line. Then run ls -a. Notice how you can now see a lot more information on the command line compared to the file browser. This is due to the option -a. When using it, ls shows all the files in a folder, including the hidden ones.
In a Unix environment, a hidden file or folder means that it starts with a dot (.), for example .config. Hidden files usually contain settings and information, that the user rarely needs to change. In Linux it is possible to see hidden files in the graphical user interface by pressing CTRL + h. If you’re using MacOS, press cmd + SHIFT + .
In the graphical user interface, you can create folders by right-clicking with your mouse, and pressing “create new folder”. In a Unix-like environment, this is done with the command mkdir, abbreviated from “make directory”. The command is given the name of the new folder as an argument.
In the end, the command line works in a similar way to the graphical user interface: cd is the same as clicking a folder and ls shows the contents of a folder. In this part, you will learn how to do things you already know how to do in a graphical environment using the command line.
Exercise 1: Graphical vs. text-based user interface 5%
You can mark this exercise as done after you've gone through the previous example of the differences between the graphical and text-based user interfaces. Make sure you replicated the examples yourself using the command line.Exercise 2: Creating a folder 5%
Create a folder named "lapio" in your home folder. Make sure you created the folder correctly by checking the output ofls.
Tips for using the command line more efficiently
If you’re used to using the graphical file browser, you’re probably wondering how slow and inefficient using the command line must be. It is naturally a question of custom, but there’s also one feature on the command line, which makes writing commands a lot faster: tab completion. With the tab key you can automatically complete filenames and sometimes even commands, depending on the program.
Let’s try tab completion. Nagivate to your home folder. First, write down cd D and press the tab key (located above CAPS LOCK) a couple of times. All the directories starting with the letter “D” should be printed to the command line, including at least Downloads and Documents.
Let’s assume that you want to move to the Downloads folder. It suffices to write “Dow”, and press the tab key, and the rest of the folder name will be completed to the command line (assuming that there are no other folders starting with “Dow” in your home folder).
Another useful trick to know is browsing old commands. This can be done by pressing the arrow key up and down. This is a useful habit you should try and adopt as early as possible. Note that when you are writing a command, you cannot use the cursor to move in the written text. You have to use the arrow keys instead, for example. You can read more about other useful keyboard combinations here.
Text processing
Gedit is a simple graphical text editor, which allows you to edit all kinds of text files. You can find Gedit in Linux by writing “gedit” to the Launcher, opened by pressing the “Windows” key. In MacOS we recommend using the application “TextEdit” for this section of the material, as it allows defining the saving location of a file, and you will be able to find it easily using the command line.
Open a graphical text editor and create a file called example.txt. Save it in the lapio folder you created earlier. The .txt is a file extension, which means that the file contains ordinary text, and not runnable code for example. Add some arbitrary text to the file.
After creating the example.txt file, navigate to the lapio folder and open it using the command nano example.txt. Nano is a text-based text editor, which is used from the command line. This means that the editor is controlled using specific key combinations instead of clicking buttons.
In order to close the editor, you have to press CTRL + X. If some changes have been made, you have to confirm whether you wish to save or discard them, by pressing y for “yes” or n for “no”. Lastly, the editor confirms the name of the saved file.
Note that nano helps you by telling the keys for specific actions at each step. This is rather common, which is why it is important to learn to read the outputs of the command you are using (as simple and stupid as it may sound). Usually the program tells your directly, which keys you should press next.
nano: command not found, nano is not installed in your system. The easiest way to install it is by using a package manager. See the end of the part for some instructions on installing applications via the command line.
\r\n whereas in Unix it's \n. Thus inspecting Windows documents created with notepad can look bizarre when accessing them using the Ubuntu command line.
Below are some instructions on creating a file using notepad++ with Unix new lines.

Note that the file you created with notepad has been created as a Windows user. In Windows 10, the command line is used as a separate Unix user. You can find the Windows user's files from the directory
/mnt/c, if you saved them to the C drive.
Exercise 3: nano 5%
Find out how the text editornano works by using Google or the man command. Make sure you know how to do at least the following things:
- Saving a file without closing nano
- Copying and pasteing in nano
example.txt, add some text into it and save without closing. Then open the file using another text editor to make sure that the contents were saved.
Exercise 4: vim 5%
Another command line text editor with a lot more features is vim. However, it is notoriously unintuitive to use for beginners. Find out the following things about using vim:- What are "insert mode" and "command mode"?
- How can you switch between then?
- How can you close vim?
Paths
A path is a pointer to a specific file or folder in a file system. It is like an address allowing one to uniquely identify the location of a desired resource. It consists mostly of filenames and slashes (/). Paths are often used as command arguments.
A path can be relative or absolute: A relative path is interpreted with respect to the current folder, whereas an absolute path is interpreted with respect to the root folder, sometimes just called the root. The root folder contains all the files and folders of the system, and it should not be confused with the personal home folder. The root folder contains all the users’ home folders. In consequence, an absolute path to a specific file is the same no matter which folder in the system it is written in. On the contrary, a relative path to a folder depends on the current folder, so it is not the same everywhere.
An absolute path always starts with the slash symbol /, because the absolute path of the root is /. If a path isn’t started with a slash the system will interpret that the user is referring to a file or folder in the current working directory. The absolute path of the current folder can be printed out with pwd (print working directory). In Linux the home folder of a user is usually located in /home/user/, and in MacOS it’s in /Users/user/. In both systems the home folder can be referred to with ~. For example, the path to the Downloads folder in Linux would be either /home/user/Downloads or ~/Downloads.
Dots are often used in relative paths. One dot . refers to the current folder, and two dots .. refers to the folder the current folder is in, or its “mother folder”. For example running cd ../.. would move the user two folders up. The relative path of the Downloads folder from the home folder is ./Downloads or just Downloads.
Here is a longer example of using absolute and relative paths:
Let’s assume that you have downloaded cat pictures for each year of the month. The pictures of each month are in their own folders, all located in a subfolder of Downloads. You have moved to the folder which contains all the cute pictures for May, whose path is ~/Downloads/cat-pictures/may/. Given that you are inside the May folder, you can refer to the Downloads folder with the path ../.., ~/Downloads or /home/user/Downloads in Linux and /Users/user/Downloads in MacOS. If you wish to refer to the November folder from the May folder, you can do so for example with the path ../november/. The slash at the end of the path highlights that the resource in question is a folder, but it is not required.
user@computer:~/Downloads/cat-pictures/may$ ls
cat1.jpg
user@computer:~/Downloads/cat-pictures/may$ cd ../../
user@computer:~/Downloads$ cd cat-pictures/may/
user@computer:~/Downloads/cat-pictures/may$ cd ../november/
user@computer:~/Downloads/cat-pictures/november$ ls
cat2.jpg
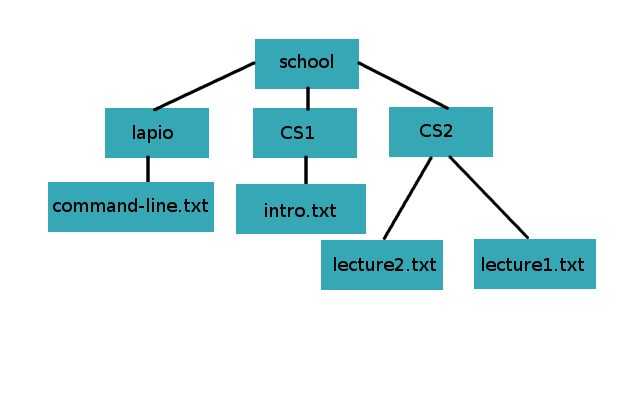
Exercise 5: File management 1 5%
In this exercise you'll practice file management from the command line. Start by creating a folder structure described in the figure below:
In the folder structure the directory school contains three folders: lapio, CS1 and CS2. The lapio folder contains a file called cmnd-line.txt, the CS1 folder contains lecture1.txt and the CS2 folder contains the files lecture2.txt and java.txt.
First create the school folder and move inside it. Then create the folder structure described above. Create some of the files and folders directly from the school folder, by using longer paths, and some by moving into the subfolder before creating a new file.
You can create a text file by opening it in a text editor and saving, or with the command touch.
ls.
Remember to use tab completion!
Moving and renaming files
In a graphical environment copying is done with the key combination CTRL + C, cutting with CTRL + X and pasteing is done with CTRL + V. Let’s see how these three procedures can be done using the command line.
Copying is done using the command cp (copy). It takes the path to the file to be copied and the target path as arguments. For example, cp example.txt example2.txt copies the file example.txt as a file called example2.txt in the current folder. Paths also allow you to copy files between folders. Running cp example.txt ~/Documents/example2.txt copies the file example.txt to the Documents folder and renames it to example2.txt. Giving an existing folder as the second argument copies the file without changing its name: cp example.txt ~/Documents/ copies the file to Documents and keeps the name as example.txt.
Files and folders can be moved with the command mv (move). The command works in a very similiar way to cp, except that the original file is deleted from the system after copying it. This corresponds to the “cutting” feature in a graphical user interface. One can also rename files using mv: if the second argument points to the same folder as the first one, the result is a renamed file.
Examples of using mv:
mv exmple.txt example.txt renames the file exmple.txt to example.txt.
mv example.txt ~ moves the file example.txt from the current folder to the home folder.
mv exmple.txt ~/example.txt renames the file exmple.txt from the current folder to example.txt and moves it to the home folder.
mv ~/example.txt ~/Downloads/ moves the file example.txt from the home folder to the Downloads folder.
Exercise 6: File management 2 5%
This exercise continues where the previous exercise left off. After creating the initial folder structure, change it to the following with commandsmv and cp:
lapio should now contain a file called command-line.txt. The folder CS1 should contain a file called intro.txt, and the folder CS2 the files lecture1.txt and lecture2.txt.
Notice that the awkward typo in
cmnd-line.txt has been fixed. The file java.txt was moved to the folder CS1 and renamed.
Exercise 7: Removing a folder 5%
Files can be removed with the commandrm (remove).
- By using the command line, remove the files you created in the previous exercise.
- Find out how you can remove a folder from the command line.
- Remove the whole
schoolfolder.
Wild cards
Wild cards allow one to perform operations on several files at the same time. Their use is supported by almost all commands in the Unix environment, unlcuding mv and cp. Perhaps the most common wild card, the asterisk * corresponds to any amount of any given symbol. It can be used at any point of a string. For example the command mv *.txt example/ moves all the files in the current directory ending with .txt to a folder caller example. Similarly mv test* tests/ would move all the files starting with test to a folder called tests.
user@hal9000:~/example$ ls
target file.txt note.txt picture.png
user@hal9000:~/example$ mv *.txt target/
user@hal9000:~/example$ ls
target toinen.png
Exercise 8: Wild cards 10%
Create a folder called pictures on the command line, and download ajpg and a png formatted pictures. Then add some text files to the folder, for example i_am_a_file.txt or i_am_not_a_picture.txt. Finally create a folder called pictures and copy all the pictures in the subfolder using wild cards. You can read about other wild cards from here for example.
Other useful commands
Sometimes one might one to examine text files without opening a text editor. The easiest command for doing this is cat, which prints tout the contents of a text file:
user@hal9000:~/esimerkki$ cat example.txt
i am
inside
the example file
However, if the text file is large, we might not want to print out all the lines. Using head or tail one can print only a specific amount of lines from the beginning or end of a file. The amount of lines printed is given to a parameter for the flag -n.
For example you can only print the first and the last rows with:
user@hal9000:~/example$ tail -n 1 example.txt
the example file
user@hal9000:~/example$ head -n 1 example.txt
i am
In the above example we gave 1 as an argument for the flag -n.
It is also possible to search for specific lines in a file. This can be done with the commans grep (search globally for a regular expression and print). The command grep allows you to filter out specific lines from a file based on some criteria. By default grep returns all the lines which contain the exact string given as an argument. Here is an example demonstrating the basic functionality of grep:
user@hal9000:~/example$ cat diary.txt
October 6th

Dear diary,

I can't wait to tell you all my secrets.

Today was a good day. I was appointed the secretary of my student association.

I won't be secretive, I'm so happy!

I'll write again soon.
user@hal9000:~/example$ grep "secret" diary.txt
I can't wait to tell you all my secrets.
Today was a good day. I was appointed the secretary of my student association.
I won't be secretive, I'm so happy!
Note that the filtering also included occurences inside another string. In most environments grep also highlights the found words with red:

Exercise 9: grep 10%
By defaultgrep is case sensitive, which means that it treats "a" and "A" differently when searching for matches.
- Take a look at the output of
grep --helpor grep'smanpage, and find out how you can make grep ignore case. - Find out (using Google for example) how you can only match occurences which are at the beginning of a line. Make sure you understood how to do this, by practicing using the command on the command line. You can for example write the following to a file:
Unix
Linux
macOS
UNiX
unique-unix
unIX
Operating system unix
UNIX
unix
unisport
and then make sure you can filter out the appropriate words with grep.
The true power of tools like grep comes out when it is paired with other commands. The output of another command can be passed on to another command with the operator |, usually called the pipe. With the pipe you can do more complicated operations which require several programs with just one line.
An example of using a pipe is to pass the output of ls to grep in order to filter out specific filenames:
user@hal9000:~/example$ ls
example.txt note2.txt note.txt
user@hal9000:~/example$ ls | grep note
note2.txt
note.txt
If one couldn’t use the pipe, the output of ls would have had to be written to a separate file before filtering with grep. The pipe allowed sharing the output of ls between the commands seamlessly.
However, sometimes writing outputs to files can be useful. The size of a terminal window is limited, and its contents cannot be scrolled backwards infinitely. Large outputs should be written to files in order to access them fully. This can be done with the operator >, which takes the name of the file to be written as an argument. For example ls > listing.txt moves the file listing to a file called “listing.txt”, creating the file if it doesn’t already exist.
Similarly, the operator < allows giving the contents of files as an argument to a command. This is again useful, if the input in question is too large to paste or the task has to be automated.
user@hal9000:~/example$ ls
Applications	Library		      Pictures	      kissakuvia
Desktop		    Linus_Torvalds	Public          script.sh
Documents	    Movies	        Downloads	Music
user@hal9000:~/example$ ls | grep Do
Documents
Downloads
user@hal9000:~/example$ ls > listing.txt
user@hal9000:~/example$ grep Do listing.txt
Documents
Downloads
user@hal9000:~/example$
> overwrites the contents of the file with the given text and >> appends them to a new line, not affecting the old contents.
Exercise 10: A Student's Notes 5%
Create a text file callednotes.txt on the command line. Paste inside the following text which describes the week of a typical student:
monday intro to java: Java is a programming language
monday unicafe: Fish shoup
tuesday intro to java: A class can implement an interface
tuesday intro to cs: Turing tests are hard to pass
tuesday unicafe: Chicken and noodles
wednesday intro to java: A java program has to have a main method
wednesday intro to cs: The internet is a big place
wednesday unicafe: beans and rice
thursday unicafe: Hernekeittoa ja pannukakkua
thursday lapio: The command line is a black box
friday unicafe: Pizza
unicafe.txt. You don't have to remove the menu from the notes file. Also separate the notes concerning the course Introduction to Java.
SSH connection
Up until now we have used the command line to run programs in the local file system. However, it is also possible to connect to another system using the command line. SSH is an encrypted connection protocol, which allows logging in to another computer using the command line. An encrypted connection means that infromation is not shared in a human readable plain text form. The goal is to make sure that only the intended recipients can decrypt messages and read their contents.
In a Unix environment an SSH connection can be established with the command ssh. Its basic functionality is the following: ssh user@server.address connects to a server at server.address and tries to login as user. The user is asked their password, and if authentication is successful, a connection is opened. The working directory is changed to the remote server on the command line, and one can run commands as in the local environment, except the commands are run in the remote system where one just connected.
The department of computer science has four different servers for remote connection. Authentication is done using the university’s account.
- melkki.cs.helsinki.fi
- melkinpaasi.cs.helsinki.fi
- shell.cs.helsinki.fi
- melkinkari.cs.helsinki.fi
All these servers direct the user to the same, personal home directory, which you can acces using all the computers at the department.
Let’s use the ssh command to create a connection to the department’s servers:
user@hal9000:~$ ssh user@melkki.cs.helsinki.fi
user@melkki.cs.helsinki.fi's password:
When connecting to a system for the first time, an error message will be displayed, stating that the server is not yet trusted. If you write yes to indicate that the server is trusted, its fingerprint will be remembered. Even though SSH is encrypted, it is not totally attack proof (as nothing in the internet generally is). If you receive this message when using a public internet for example, it could be safer not to establish a connection, since you could be the victim of an attack.
When the connection has been established, the command line will look slightly different:
user@melkki:~$
The current folder in the command line has changed to the home directory of your department’s user, and you can access all its files. You can end the connection by running exit.
You can read more about SSH from here for example.
SSH key pairs
When using the ssh command in the previous section, you authenticated yourself with the department’s user credentials. There is also another way: an SSH key pair consisting of a public and a private key. In practice, the keys are two long strings, which seem random. They are used to make sure that only authorized people can access certain information. This is an encryption technique we will not cover more in detail on this course, but which you can read more about by searching for example public key encryption or asymmetric cryptography. It suffices to understand that the private key should only be known by its owner, whereas the public key can safely be shared with others.
You can create an SSH key pair with the command ssh-keygen. The command asks for a password and a location for the key. We recommend not changing the default location of a key pair without a specific reason. The default location is the .ssh folder in the current user’s home directory.
user@hal9000$ ssh-keygen
Generating public/private rsa key pair.
Enter file in which to save the key (/home/user/.ssh/id_rsa): /home/user/.ssh/id_rsa_test
Enter passphrase (empty for no passphrase):
Enter same passphrase again:
Your identification has been saved in /home/user/.ssh/id_rsa.
Your public key has been saved in /home/user/.ssh/id_rsa.pub.
The key fingerprint is:
SHA256:asdasdadsfasdasdasdasdasdasd
The key's randomart image is:
+---[RSA 2048]----+
|    .      ..oo..|
|   . . .  . .o.X.|
|    . . o.  ..+ B|
|   .   o.o  .+ ..|
|    ..o.S   o..  |
|   . %o=      .  |
|    @.B...     . |
|   o.=. o. . .  .|
|    .oo  E. . .. |
+----[SHA256]-----+
The command creates two files in the .ssh folder. The file with the .pub extension contains the public key, which you can safely share with others. The other file without an extension contains the private key, which you should treat with equal care as you would a password.
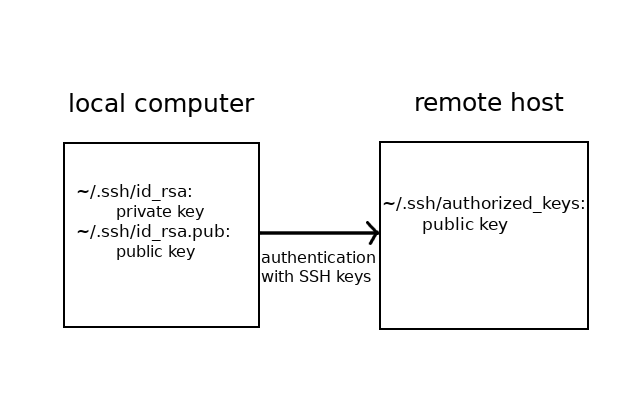
Authentication with an SSH key pair is possible, when the public key is added to the server where one wishes to be authenticated. Then one can log in to the system, if one knows the private key corresponding to the public key. The public key is added to the path ~/.ssh/authorized_keys, that is to the folder .ssh in the user’s home folder, to the file authorized_keys. If you are using multiple keys, each one should be added to a new line in the file. You’ll probably have to create the folder and the file yourself on the university’s server.
Here is a picture of the correct locations of the keys when logging in to the department’s servers with an SSH key pair:
The public key can be moved to the remote server with the command scp for example, which allows copying files between two distinct systems (cp was for copying inside the local system). The command is used in the following way:
scp path/to/copyable/file user@palvelmen.osoite:path/to/target/folder
Notice the colon between the remote server’s address and the target path!
.ssh file on the remote server (you'll probably have to create it yourself) and then rename the key file appropriately.
It's also a good idea to see how
scp works if the target file doesn't exist.
Copying the public key file can also be delegated to the command ssh-copy-id.
The authentication works correctly, when creating an SSH connection you can login using the password set for the SSH key pair.
In order not to rewrite the passoword each time you want to log in, you might want to add the password to the ssh agent. Having done that, the password has to only be written once you’ve logged out of the system. This can be done using two commands:
# make sure the agent is ready
eval $(ssh-agent -s)
# assuming you are using the default path
# otherwise provide the path to the private key
ssh-add
Exercise 11: SSH connection 10%
Create an SSH key pair on your computer. Then enable logging in to the department's servers with the key when establishing an SSH connection. Finally test out the key pair. If possible, do this using other than the department's computers. If you don't have access to the department's servers, i.e. you do not have a university account, you can mark the exercise done after generating the SSH key pair.ssh -i path/to/private/key user@remote.server.address
Wget
You are probably using a browser like Firefox or Google Chrome to read this material right now. They are both used in a graphical environment. Internet can also be browsed using the command line, but essentially a website on the internet is just a file which you can download to your computer and view locally.
The command required to download something from the internet is wget (world wide web get). The simplest way to download a site at site.address is with wget site.address. Websites are written in a language called HTML, which you will learn more about in the third part of this course. Thus the file you will download has the extension .html.
Exercise 12: Wget and HTML code 5%
- Download a site of your liking to your computer using
wget. - Open the
.htmlextensioned file using a graphical browser like Firefox or Chrome (try clicking it in the graphical file browser). The site will most likely look different from what you're used to. - Open the file in such a way that allows you to see the actual HTML code. In other words, open the file using something other than a browser. The code has a lot of tags marked with "<" and ">", and one of the first ones should contain "html".
- What was the program you used to open the file in each case? Think about how the program processed the file (in a very general way).
Exercise 13: Wget, grep and Linus Torvalds 10%
The goal of this exercise is to count how many lines of the Wikipedia article about Linus Torvalds contains the word "Linux".
- Download the Wikipedia article about Linus Torvalds to your computer using
wget. - Using
grep, filter out the lines containing the word "Linux". Write the lines to a new file. - Search online how you can count the lines of a file using the command line. Count the number of lines in the file you created.
Permissions
In Unix-like systems, the ability to read, edit and execute files and folders is controlled with permissions. This is especially useful in systems used by several users, such as the one at our department.
The Read permission allows the user to read the contents of a file. A user with the permission to write can edit a file. The permission to execute means that if the file is a program for example, the user can run it. Execute permissions are also required in order to move inside a folder with cd. If a user doesn’t have the necessary persmission, usually the error Permission denied is printed out.
Each file and folder has their own permissions. In addition, they all have an owner. The user who created the file is the owner by default, but ownership can also be transferred.
The permissions and ownerships of a file can be seen with the flag -l of the command ls. Here is an example of the output of ls in an example folder.
user@hal9000:~/example$ ls -l
total 8
-rw-r--r-- 1 user user 16 Jun 31 21:41 example.txt
-rwxr--r-- 1 user user 0 Jun 14 17:25 notes.txt
-r--r--r-- 1 user user 0 Jun 3 23:13 article.txt
drwx------ 2 user user 130 Jun 14 17:54 diart
Each file and folder in the directory has its own line. The first column in the output, containing different mixtures of letters and dashes, describes the the type and the permissions of the file.
The first letter is either - or d, which tells if the resource is a file - or a directory d. There are also other types of files, but these are the most common. The following nine symbols are reserved for the permissions themselves. The permissions are always marked in the same order: read (r), write (w) and execute (x). The first three symbols describe the permissions of the owner. If there is a dash - at the place of a specific permission, the permission is missing, i.e. it has not been given.
The next three symbols reveal the permissions of the group of the file. A group is a way of bundling users together. For example all the students of the department of computer science could be in the same group. A file is assigned to a group, and the group can have certain permissions. These permissions apply to all members of the group.
The last three symbols describe the permissions of other users: Those who are not the owner, or belong to the group of the file.
After permissions one can see the number of links pointing to a file. In folders this amount also contains the files inside the folder. Links are pointers to other files.
Next one can see the owner and the group of a file. In this case the group of the file is the username user. Lastly you can see the size of the file in bytes, the day it was last edited, and its name.
In the example above the notes.txt file’s owner has read, write and execute permissions. The group and others only have the read permission. The diary directory has read, write and execute permissions only for its owner, the group and others don’t have any permissions. The file article.txt can be read by everyone, but it can’t be read or edited by anyone.

Permissions can be changed by the file owner or the system administrator. They can be altered with the command chmod (change mode). It takes a string describing the alterations and the target file path as arguments. The permission string tells which permissions are added or removed, and who the permissions concern.
The symbols desribing the permissions is built using the following components:
- r = read permission
- w = write permission
- x = execute permission
- u = owner of the file
- g = users belonging to the group of the file
- o = all other users
If the recipient of permissions is not defined, the permissions are given to all user groups (owner, group and others).
The dash symbol - removes a permission and the plus sign+ gives a permission.
Here are some examples of using chmod:
chmod u+x example.txt gives the owner of the file execute permission.
chmod o-w example.txt removes other users the write permission.
chmod go+r example.txt gives the group of the file and other users the permission to read the file.
user@hal9000:~/example$ chmod -r example.txt
user@hal9000:~/example$ cat example.txt
cat: example.txt: Permission denied
user@hal9000:~/example$ chmod +r example.txt
user@hal9000:~/example$ cat example.txt
paras
example
user@hal9000:~/example$ chmod o+w example.txt
user@hal9000:~/example$ ls -l
total 8
-rw-r--rw- 1 user user 16 Jun 31 21:41 example.txt
-rw-r--r-- 1 user user 0 Jun 14 17:25 note2.txt
-rw-r--r-- 1 user user 0 Jun 3 23:13 note.txt
drw-r--r-- 1 user user 130 Jun 14 17:54 diary
Exercise 14: Practising permissions 10%
Create a file calledpermission.txt and practise giving and removing permissions. Define the file's permissions to be each of the following:
-rwxr--r--
-rw-r--r--
-rw-------
-r-xrw--w-
/cs/home/your_uni_username. If the folder is not found, (you get No such file or directory when trying to cd into it), please activate your CS account following these instructions.
You can read more about permissions for example here.
Scripts
Scripts are files containing code which can be run on the command line. They are used primarily for automating tasks, which can be tedious to do manually. A script can be run by writing it’s path on the command line. When in the same folder with the script it can be run with the command ./script_name.
There are different programming languages for writing scripts. One of them is called Bash. It is the default interpreter in Unix systems, which means that you can run scripts written in Bash in Linux and MacOS commnd lines by default. Bash scripts should be started with a special line: #!/bin/bash. This string is called a shebang and it tells the system with which language the script should be interpreted as. The extension for script files is usually .sh.
You can also call programs from scripts. For example, here’s how you could write a script that shows the contents of the file where it is run.
Open a file called script.sh and write the following inside:
ls
After saving the file, make sure you have execute permissions and run the script:
hal9000:~ user$ chmod u+x script.sh
hal9000:~ user$ ./script.sh
Applications	Library		      Pictures	      kissakuvia
Desktop		    Linus_Torvalds	Public          script.sh
Documents	    Movies	        Downloads	Music
Note however, that some things act differently when used in scripts. For example the command cd doesn’t work similarly as is.
Remember that in order to run a file, it has to be given execute permissions with the command chmod.
Exercise 15: A small bash script 5%
- Find out how you can print text to the standard output in Bash.
- Write a small script which outputs "Hello world!".
- Run the script and make sure it works properly, i.e. there are no errors and "Hello World" appears to the terminal.
- Try to find out why the first programming exercises usually involve printing "Hello world!".
Sudo
It recommended to separate superusers from regular users in a computer system. This makes the system less vulnerable for security threats. Superusers have special position in the system hierarchy, and all their code is run in a privileged state. The privileged state can be dangerous, if malicious code is run by accident. This is why one should always use their computer as a regular user by default.
However, a regular user can run commands with the privileges of a superuser, if they belong to the sudoers group. This can be done by adding sudo in front of the command. The user will be prompted with their own password. Using sudo is often required for installing programs with a package manager for example. Nonetheless, unnecessary use of sudo should be avoided. You will need it sometimes, but you shouldn’t append it before each command to avoid permission errors.
You shouldn’t try to run sudo commands on the department’s computers, such as the ones found in the computer labs or when connected via SSH. This will be logged as malicious behaviour.
Installing
The world is filled with different programs designed for the command line. The easiest way to install command line tools is with a package manager. Probably the most common ones are Apt (Linux) and Homebrew (MacOS).
Ubuntu and Cubbli (the version of Linux used in the department’s systems) should have Apt (or a very similiar program called apt-get) installed by default. In MacOS you’ll have to install Homebrew yourself. You can find instructions on how to use apt from here for example. Using a package manager is highly recommended.
The simplest way of using a package manager is by using the command install, and giving it the name of the desired program as an argument.
For example, here is how you could install the command line text editor nano:
With Homebrew:
brew install nano
And with Apt:
apt install nano
When a command has been installed via a package manager, it can usually be called directly from the command using some specific command. Check the command from the program’s documentation.
One can also update and remove packages using a package manager. In order to update packages, first run update in order to fetch the latest information regarding installed packages, and then upgrade to actually install new versions. Packages can be removed by using remove and specifying the removable package’s name.
Installing, updating and removing packages via a package manager usually required sudo privileges. Then sudo should be appended before the command.
It is also possible to install programs without package manager. This is much more tedious, and involves, for example, defining environment variables, such as PATH. Environment variables define the execution environment of the system. In practice this means defining values for some system wide variables. The PATH variable defines where all runnable programs are located. This enables using a simple command for running them on the command line instead of writing out the specific location of the executable program. You can read more about environment variables for example from here.
The system’s environment can be defined using scripts so that it doesn’t have to be redefined with every new session. One of the scripts used for this is ~/.bashrc, which in Linux is run each time a new terminal window is opened. Another one is ~/.bash_profile, which is run on each log in. Thus ~/.bashrc is where the PATH variable is usually defined. In MacOs the default terminal program runs ~/.bash_profile on each new terminal window instead of ~/.bashrc. You can read more about the differences of these two scripts here.
The end
This is the end of the first section of the course. Learning how to use the command line may take some time, but you will surely get used to it. The Unix community offers a lot of help on the Internet: There is for example a Unix forum in Stack Exchange. The documentation of MacOS is quite user friendly, and there exists a forum as well.
It’s worthwhile to learn the basics of the command line even though it might seem pointless at first. The command line is still an essential part of a programmer’s job. Many find that using the command line for mundane tasks is a lot faster than using a graphial interface, and usually the necessary programs are published as command line tools. Using a graphical tool may actually slow you down. Sometimes a graphical user interface for a program may not even exist. In the end, it is all a question of opinions of course.
Now take a break. You can pat yourself in the back! Then revisit the material and the learning goals to distinguish which parts you still need to revise.
This was only an introduction to the command line. There are several other tools, tricks and commands which were not covered. You will learn them once you need them. Here are some quick tips which might come in handy sometime:
watch: repeat a command in certain intervals&&tai;: chain several commandsalias: define an alias for a command. For example you can define a shorter version for a long and complicated command.&: ending a command with this will make sure the command line will not be locked as the process will be moved to the backgroundhistory: view your command historyCtrl + r: find commands you have run previously